Template Partials using Stash
by Adrienne Travis
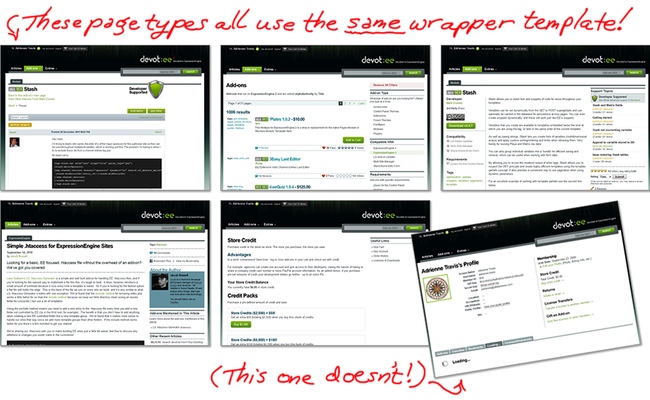
The standard approach to EE templates has been to have a rough equivalence between a template and a page, or a template and a content type. Templates include a header and footer, which are usually done as snippets or embeds, and some content (possibly inline, possibly using more snippets and/or embeds).
The language of “template partials” is from the Ruby on Rails world, but the concept is solid for any framework in any language. In a nutshell, the idea is this: you have one wrapper template that has containers in it, and then you fill in those containers later. The wrapper template doesn’t care what’s in the containers, and the containers don’t care about the wrapper.
“But,” you may say, “my templates are all wrappers with containers for stuff! The stuff is all different, that’s why we have to have different templates!” It’s true that the “stuff” is all different—but are the containers all different? Take a look at a typical site you’ve built—I bet that you have at most two or three markup patterns for the whole thing.
If you’re used to the typical way of working with ExpressionEngine templates, you’ll see as we go on that the template partials pattern requires thinking “inside-out” for a while. However, there are some huge benefits to switching to this way of thinking.
What are the benefits of template partials?
In short, the main benefits of using the template partials pattern are:
- Code reuse
- Readability/maintainability
- Performance
These three things aren’t easy to separate from each other, of course—what improves one will tend to improve the others. So rather than splitting them out into separate sections, let’s look at some code and see what the effects are in an integrated way.
Here’s a cut-down sample from one of my own “old-style” EE templates. (Note that snippets are prefixed because of the Snippet Sync addon). I suspect that you have written templates that look more or less like this one.
{embed="global/.header"}

{embed="global/.breadcrumbs"}
<div class="{if segment_1 == ''}page{if:else}{segment_1}{/if}">
    <h2 class="page-title">{structure:page:title}</h2>
    {snippet:nav_sub}
    {exp:channel:entries  channel="pages"  limit="1"}
        <div class="item">
            {!-- entry stuff here --}
        </div>
    {/exp:channel:entries}
</div>

{snippet:global_footer}
This is a simple template, but even so, there’s an advanced conditional and two embeds.
This template pattern does reuse some code; those snippets and embeds are definitely helpful. But if I have fifteen templates on this site, it’s likely that almost every one of those fifteen has the very same snippets and embeds. How DRY is that? Not very!
Plus, what’s in those header and footer snippets? Presumably global_header has the html tag and the head tag, including all of our metadata and CSS calls and etc. From the look of it, it also contains our opening body tag, and probably some initial <div> tags like our page container. And global_footer probably has the closing divs for the page containers, as well as the closing body and html tags.
(I don’t know about anyone else, but I absolutely hate having open/close tags in different files—I find it unreadable and confusing. What if the opening block changes? What if we had a container <div> and decide to take it out? Now we’ve got two files to change, the header and the footer! But of course we have to do it this way, because otherwise we have all that markup in 30 different templates instead, right?)
For contrast, here’s a sample from one of my “wrapper” templates, on a site using the partials approach:
<!DOCTYPE html>
<html lang="en">
    <head>
        {snippet:global_html-head}
    </head>

    <body class="{exp:stash:get name='bodyclass'}">
        <div class="page clearfix">
            {snippet:global_header}
            {exp:stash:get name='content'}
            {snippet:global_footer}
        </div>
    </body>
</html>
See how the head and body are in the template itself? We can do that because there are only two of these wrappers for the whole site, and the other one is for entirely different markup. We do have a wrapper div, as you can see; if we have to change it, this is the only file we would have to visit to do so.
Here, now, is one of the templates that calls a wrapper.
{embed="layouts/.mobile-page"}

{exp:channel:entries}
    {exp:stash:set name="bodyclass"}home{/exp:stash:set}

    {exp:stash:set name="mobilecontent"}
        <section class="body">
            <div class="grid">
                {!-- stuff goes here --}
            </div>
        </section>
    {/exp:stash:set}
{/exp:channel:entries}
This template contains one embed (for the wrapper template) and no advanced conditionals. (There are probably conditionals in the content, but that’s true of the “traditional” pattern as well. We’re just looking at the basic layout/structure, here.) Lowering the number of embeds and advanced conditionals improves performance, potentially by a great deal.
History of partials in EE
In January 2011, John D. Wells wrote an article called Homegrown plugin to create template “partials” for ExpressionEngine, in which he introduced (or at least brought to a wider audience) the concept of template partials. He walked readers through the process of creating a wrapper template and creating a custom plugin to store content and retrieve it for the wrapper.
Wells did a great job of demystifying the process of creating a plugin, but in the long run the much more important result of his article was that it got people started thinking about the partials pattern and ways to implement it in EE.
Partially inspired by Wells’ article, in February 2011 Mark Croxton released the Stash plugin. This was largely a more versatile version of things that already existed, like eMarketSouth’s String plugin and Leevi Graham’s NSM Transplant plugin; however, Croxton was focused from the beginning on being able to use Stash for template partials.
The key insight that makes either approach work is that in EE’s parse order, embeds are parsed absolutely last. That means that everything that happens inside your main template is potentially available to your embedded templates!
Stash is a great add-on, and using it to implement the partials pattern is now my standard approach to EE templating. (Homegrown plugins are great for learning purposes, but on production sites I tend to prefer addons that someone else is actively maintaining!)
Walkthrough: implementing partials in EE
Template Setup
First, of course, set up your template groups in a way that makes sense to you. I use Structure for most of my sites, so there’s no necessary binding of a template group to a section or channel. On larger sites I may use that kind of setup anyway, because it’s convenient not to have one directory with everything in it. (Some partials may be used across channels, however, so think about where to put those.) On average-sized sites, however, I tend to use one directory for wrappers and one for partials, rather than splitting the partials out.
Examples of both of these “typical” setups are shown below. Note that in both cases wrappers is for all of the wrapper templates; you should always keep those in a separate template group. I’ve omitted index.html templates in groups where they’re not actually being used.
Average-Sized Site
wrappers
    .home.html
    .interior.html
    .modals.html
layouts
    detail-pages.html
    forms.html
    listings.html
    section-main-pages.html
Large Site
blog
    article.html   {!-- partial --}
events
    index.html     {!-- partial --}
    detail.html    {!-- partial --}
forms
    form.html      {!-- partial --}
global
    listings.html  {!-- partial --}
wrappers
    .home.html
    .interior.html
    .modals.html
static-pages
    detail.html    {!-- partial --}
I mentioned earlier in this article that the template partials pattern requires thinking inside-out about your EE templates, at least at first. You can see that your wrapper templates are all marked as hidden—that’s the first sign of that inside-out thinking. You will never call any wrapper template directly; you will only use them in embeds.
Wrappers
Think about your site. Mentally delete all the content from it; how many wrappers does it have? Most sites probably have at least two: a homepage and an interior page.
In some cases, you have an interior page with a sidebar and an interior page without a sidebar; those could be merged into one partial with a conditional, or separated out into two, depending on how you end up being comfortable. Some very complex sites may have more than three, but that’s going to be pretty rare.
The rule is: if the markup is the same, it’s a single wrapper template, no matter what the content is like. The same is true of pages where the markup only differs by a single class on the navbar or the body—those pages are a single wrapper, and we assign the class in the partial.
(I have seen people advocating an approach where you only have one wrapper template, no matter what, using conditionals to turn on and off different bits of markup (using Croxton’s If:Else or Switchee, to prevent performance issues). That’s certainly a valid approach; however, in my opinion it adds back in complexity that we’re trying to get rid of. I’m not completely opposed to conditionals, certainly, but I prefer to have wrapper templates that are fairly atomic and handle one “type” of markup, because I think that leads to better readability and better maintainability. So this walkthrough assumes multiple wrapper templates.)
Next, take one of your sets of markup and turn it into a real wrapper template by figuring out where blocks go, and whether they are blocks that get set in the partial, or whether they’re just a snippet that’s the same (or mostly the same) everywhere. A lot of this is going to feel much the same as an “old-style” EE template setup, but we’re going to walk through it step by step anyway.
Step 0
Here’s a very stripped down version of the Devot:ee add-on page markup that we’ll use to work on:
<!DOCTYPE html>
<html lang="en">
    <head>
        <title>ADDON NAME -- Devot:ee - Devoted to ExpressionEngine</title>
            {!-- scripts and meta tags --}
    </head>
    <body id="add-ons">
        <div id="loginBox">
            {!-- stuff --}
        </div>
        <div class="wrapper">
            <div class="bgContainer">
                <div class="mainContainer clearfix">
                    <div id="header" class="clearfix">
                        <h1>devot:ee: Devoted to ExpressionEngine</h1>
                        <ul id="mainNav" class="sf-menu">
                            {!-- nav items --}
                        </ul>
                        <div class="searchBox">
                            <form id="search-selection">
                            </form>
                        </div>
                    </div>
                    <div class="interiorContainer clearfix">
                        <div class="interiorContent">
                            <div class="categoryBar">
                                <h4 class="category">{!-- cat --}</h4>
                            </div>
                            <div id="content" class="col685 gutter">
                                {!-- addon details/compatibility --}
                                <div class="addonContent">
                                    {!-- actual addon content --}
                                </div>
                                <div id="reviews" class="col685 commentBlock">
                                    {!-- reviews --}
                                </div>
                            </div>
                            <div id="sidebar" class="col265">
                                {!-- addon related stuff --}
                            </div>
                        </div>
                    </div>
                </div>
            </div>
            <div id="footerContainer" class="clearfix">
                <div id="footer">
                    {!-- stuff --}
                </div>
            </div>
        </div>
    </body>
</html>
Step 1
The stuff in the head, as well as the login, header, and footer boxes, are going to be the same for every page on the site. Let’s split those out into snippets. (The nav may get an active class, but that’s still “the same” for our purposes since whatever is generating the nav will handle that part.)
That leaves us with this:
<!DOCTYPE html>
<html lang="en">
    <head>
        <title>ADDON NAME -- Devot:ee - Devoted to ExpressionEngine</title>
        {snippet:global_html-head}
    </head>
    <body id="add-ons">
        {snippet:global_loginbox}
        <div class="wrapper">
            <div class="bgContainer">
                <div class="mainContainer clearfix">
                    {snippet:global_header}
                    <div class="interiorContainer clearfix">
                        <div class="interiorContent">
                            <div class="categoryBar">
                                <h4 class="category">{!-- cat --}</h4>
                            </div>
                            <div id="content" class="col685 gutter">
                                {!-- addon details/compatibility --}
                                <div class="addonContent">
                                    {!-- actual addon content --}
                                </div>
                                <div id="reviews" class="col685 commentBlock">
                                    {!-- reviews --}
                                </div>
                            </div>
                            <div id="sidebar" class="col265">
                                {!-- addon related stuff --}
                            </div>
                        </div>
                    </div>
                </div>
            </div>
            {snippet:global_footer}
        </div>
    </body>
</html>
Step 2
The title and the body ID are going to change; let’s make sure we’re grabbing those values from the partial. We’ll do that using the exp:stash:get tag and fetch the title and the body ID.
<!DOCTYPE html>
<html lang="en">
    <head>
        <title>{exp:stash:get name='title'} - Devot:ee - Devoted to ExpressionEngine</title>
        {snippet:global_html-head}
    </head>
    <body id="{exp:stash:get name='body_id'}">
        {snippet:global_loginbox}
        <div class="wrapper">
            <div class="bgContainer">
                <div class="mainContainer clearfix">
                    {snippet:global_header}
                    <div class="interiorContainer clearfix">
                        <div class="interiorContent">
                            <div class="categoryBar">
                                <h4 class="category">{!-- cat --}</h4>
                            </div>
                            <div id="content" class="col685 gutter">
                                {!-- addon details/compatibility --}
                                <div class="addonContent">
                                    {!-- actual addon content --}
                                </div>
                                <div id="reviews" class="col685 commentBlock">
                                    {!-- reviews --}
                                </div>
                            </div>
                            <div id="sidebar" class="col265">
                                {!-- addon related stuff --}
                            </div>
                        </div>
                    </div>
                </div>
            </div>
            {snippet:global_footer}
        </div>
    </body>
</html>
Step 3
Everything inside <div class="interiorContent"></div> is related to the individual add-on (and, generalizing to other pages on the site, it’s likely that that block is where all of the main content for every page goes). So let’s pull it out into our partial, which will leave us with this wrapper template:
<!DOCTYPE html>
<html lang="en">
    <head>
        <title>{exp:stash:get name='title'} - Devot:ee - Devoted to ExpressionEngine</title>
        {snippet:global_html-head}
    </head>
    <body id="{exp:stash:get name='body_id'}">
        {snippet:global_loginbox}
        <div class="wrapper">
            <div class="bgContainer">
                <div class="mainContainer clearfix">
                    {snippet:global_header}
                    <div class="interiorContainer clearfix">
                        <div class="interiorContent">
                            {exp:stash:get name='maincontent'}
                        </div>
                    </div>
                </div>
            </div>
            {snippet:global_footer}
        </div>
    </body>
</html>
You can certainly optimize this further—in real life, for example, I’d almost certainly have a separate content block for the sidebar—but it’s good enough for our walkthrough here. Anything using the exp:stash:get tag is a “container” whose content will be retrieved from our partial; in this template we have three containers:
- title
- body_id
- maincontent
Partials: Detail Page/Individual Entry
We’ve got a wrapper—now let’s get content into it! The easiest case is detail pages, where there is only got one entry retrieved by the Channel Entries tag pair. Let’s start with that.
Step 0
Here’s the stuff that we took out of our wrapper template earlier; let’s paste it into our notional partial.
<div class="categoryBar">
    <h4 class="category">{!-- cat --}</h4>
</div>
<div id="content" class="col685 gutter">
    {!-- addon details/compatibility --}
    <div class="addonContent">
        {!-- actual addon content --}
    </div>
    <div id="reviews" class="col685 commentBlock">
        {!-- reviews --}
    </div>
</div>
<div id="sidebar" class="col265">
    {!-- addon related stuff --}
</div>
Step 1
The first thing we need to do is make sure that our wrapper template gets called! We do that using an embedded template. Since embeds get called last, it doesn’t matter where in our template it goes; I tend to put it at the top, so that we know instantly what wrapper a given page is using.
{embed="layouts/.interior"}

<div class="categoryBar">
    <h4 class="category">{!-- cat --}</h4>
</div>
<div id="content" class="col685 gutter">
    {!-- addon details/compatibility --}
    <div class="addonContent">
        {!-- actual addon content --}
    </div>
    <div id="reviews" class="col685 commentBlock">
        {!-- reviews --}
    </div>
</div>
<div id="sidebar" class="col265">
    {!-- addon related stuff --}
</div>
Step 2
Next we need to add in our Channel Entries tag pair; we also need to make sure that our body ID and Title are getting set for Stash. The body ID is just the first segment, so it doesn’t need to be inside our Channel Entries loop. The title, on the other hand, does. We wrap the stuff we want in exp:stash:set tags as follows:
{embed="layouts/.interior"}
{exp:stash:set name='body_id'}{segment_1}{/exp:stash:set}

{exp:channel:entries limit="1"}
    {exp:stash:set name='title'}{title}{/exp:stash:set}
    <div class="categoryBar">
        <h4 class="category">{!-- cat --}</h4>
    </div>
    <div id="content" class="col685 gutter">
        {!-- addon details/compatibility --}
        <div class="addonContent">
            {!-- actual addon content --}
        </div>
        <div id="reviews" class="col685 commentBlock">
            {!-- reviews --}
        </div>
    </div>
    <div id="sidebar" class="col265">
        {!-- addon related stuff --}
    </div>
{/exp:channel:entries}
Step 3
At the end of the last step, we had everything in place except the main content, and by now I imagine you see how to make that work. So, here’s our final (for now) partial template, with the whole content block for the add-on page wrapped in another exp:stash:set tag:
{embed="layouts/.interior"}
{exp:stash:set name='body_id'}{segment_1}{/exp:stash:set}

{exp:channel:entries limit="1"}
    {exp:stash:set name='title'}{title}{/exp:stash:set}
    {exp:stash:set name='maincontent'}
        <div class="categoryBar">
            <h4 class="category">{!-- cat --}</h4>
        </div>
        <div id="content" class="col685 gutter">
            {!-- addon details/compatibility --}
            <div class="addonContent">
                {!-- actual addon content --}
            </div>
            <div id="reviews" class="col685 commentBlock">
                {!-- reviews --}
            </div>
        </div>
        <div id="sidebar" class="col265">
            {!-- addon related stuff --}
        </div>
    {/exp:stash:set}
{/exp:channel:entries}
Partials: Listing Page/Multiple Entries
The above is all very well for a single-entry page, but what about listing pages? Excellent news: they’re just as easy! Instead of exp:stash:set we use exp:stash:append, which appends data to the end of our variable instead of overwriting it each time through the loop.
Step 0
First we’re going to grab the markup from our previous template partial, and play with it a little to come up with a reasonable listing page skeleton. You can see that below:
{embed="layouts/.interior"}
{exp:stash:set name='body_id'}{segment_1}{/exp:stash:set}
{exp:stash:set name='title'}My Awesome Blog{/exp:stash:set}

<div id="content" class="col945 gutter">
    {exp:channel:entries channel="blog_entries"}
            <div class="blog-item">
                {!-- each item here --}
            </div>
    {/exp:channel:entries}
</div>
Notice that our title variable has moved outside of the channel:entries tag, as has <div id="content">. That’s because we’ve got more than one entry inside our main loop. We’re still setting body_id to segment 1, though.
Step 1
Here’s what we need to do to make to let this template partial work inside our original wrapper template. Notice that stash:append is smart enough to create its variable if it doesn’t already exist, so we don’t run into problems on the first time through the loop!
We do, unfortunately, have to use conditionals on this loop, if we use this approach. (We need to add our opening and closing div tags on the first and last times through the loop.) However, they are simple conditionals rather than complex conditionals, so there will not be issues with performance or parse order.
{embed="layouts/.interior"}
{exp:stash:set name='body_id'}{segment_1}{/exp:stash:set}
{exp:stash:set name='title'}My Awesome Blog{/exp:stash:set}

{exp:channel:entries channel="blog_entries"}
    {exp:stash:append name='maincontent'}
        {if count == 1}
            <div id="content" class="col945 gutter">
        {/if}
        <div class="blog-item">
            {!-- each item here --}
        </div>
        {if count == total_results}
            </div>
        {/if}
    {/exp:stash:append}
{/exp:channel:entries}
Now at the point when the wrapper gets embedded, the maincontent variable contains all of the items from the loop, appended together in one long string. Additionally, to the conditionals using count and total_results, our <div id="content"> is wrapped around the outside of the list.
Update: A few folks have asked me, in the day since this article was originally written, why I didn’t use an easier approach here that wraps stash:set around the outside of the Channel Entries tag pair, rather than using stash:append. The reason I didn’t include this approach originally is because while it is easier, in the general case, I’ve found that sometimes it runs into issues with parse order that can be extremely tricky to fix. However, I’ve been convinced by these folks that that’s not a good enough reason to leave it completely out of this tutorial, because it does simplify things a great deal when it works.
So in many–if not most–cases, you can create your listing by wrapping the stash:set tag outside of the Channel Entries tag pair, like so:
{embed="layouts/.interior"}
{exp:stash:set name='body_id'}{segment_1}{/exp:stash:set}
{exp:stash:set name='title'}My Awesome Blog{/exp:stash:set}

{exp:stash:set name='maincontent'}
    <div id="content" class="col945 gutter">
        {exp:channel:entries channel="blog_entries"}
            <div class="blog-item">
                {!-- each item here --}
            </div>
        {/exp:channel:entries}
    </div>
{/exp:stash:set}
If you find that things are going wrong, however, you may have to switch to the stash:append method. I’ve decided I’ll work on putting together some test cases and figure out how to solve the parse order issues that crop up occasionally; look for that in a future tutorial!
Partials: Complicated Stuff
Okay, now let’s talk about a complicated case.
Here’s the situation: we have a Structure page with its own blurb, but it also contains a listing for another channel. The listing has both Featured status entries and Open entries, with slightly different data showing. Also, the Featured entries have to appear before the Open entries, but all of the entries within each status have to be sorted by title. And as if all of that weren’t enough, we have a sidebar on the page that’s pulling a random testimonial from yet a third channel!
This is fairly similar to a template I had to build on a recent project. In the past I would have resorted to at least one embed, possibly two; and we might have had to hack together a custom plugin or a query using the Query Module to handle the Featured/Open listings. But no more. Our new paradigm will handle all of this with zero embeds (except the ever-present wrapper template embed at the top) and zero custom queries.
The secret is in EE’s parse order. All Channel Entries loops on a page parse “at the same time” from the perspective of the template engine, but if you take a closer look, they actually get parsed top to bottom.
Step 0
Here’s some extrapolated markup for our page. We’ve got a Channel Entries tag pair in there, for our Structure entry; we can think of that as the main loop on the page. We’re using that loop to set our title, and we’re setting our body_id the same way we have set it for our previous partials.
{embed="layouts/.interior"}
{exp:stash:set name='body_id'}{segment_1}{/exp:stash:set}

{exp:channel:entries limit="1" channel="structure_pages"}
    {exp:stash:set name='title'}{title}{/exp:stash:set}
        <div id="content" class="col685 gutter">
            <div class="pageContent">
                {!-- actual page content --}
            </div>
            <div id="listingContent" class="col685 peopleBlock">
                {!-- listing content --}
            </div>
        </div>
        <div id="sidebar" class="col265">
            {!-- random testimonial goes here! --}
        </div>
{/exp:channel:entries}
Step 1
The next step is getting the random testimonial in place. Remember what I said above about Channel Entries loops getting parsed top to bottom? Let’s add a loop for the testimonial, above our previous loop, with a stash:set tag in it. (Remember to add dynamic="no" on the additional Channel Entries tag pairs; I forget it all the time.)
{embed="layouts/.interior"}
{exp:stash:set name='body_id'}{segment_1}{/exp:stash:set}

{exp:channel:entries limit="1" channel="testimonials" orderby="random" dynamic="no"}
    {exp:stash:set name='random_testimonial'}
        <div>
            {!-- testimonial content --}
        </div>
    {/exp:stash:set}
{/exp:channel:entries}
Now, inside our main loop, which is crucially further down the template, we can use exp:stash:get to grab the value that we set above:
{exp:channel:entries limit="1" channel="structure_pages"}
    {exp:stash:set name='title'}{title}{/exp:stash:set}
        <div id="content" class="col685 gutter">
            <div class="pageContent">
                {!-- actual page content --}
            </div>
            <div id="listingContent" class="col685 peopleBlock">
                {!-- listing content --}
            </div>
        </div>
        <div id="sidebar" class="col265">
            {exp:stash:get name='random_testimonial'}
        </div>
{/exp:channel:entries}
Now the testimonial block is right where it needs to be!
Step 2
This is the awesome, complicated part: pulling our listing, sorting entries by title, and dividing them up by status. EE will not let us order a channel:entries tag by status (that’s why I chose this example). We can order by title, though, so we can get that part of the sorting done.
For this we’re going to use a new set of tags, exp:stash:append_list and exp:stash:get_list. These create “multidimensional arrays” of data, almost like channel:entries itself. We’re also going to introduce the context parameter, which lets us divide things into different variables on the fly.
Here’s the stuff from Step 1:
{embed="layouts/.interior"}
{exp:stash:set name='body_id'}{segment_1}{/exp:stash:set}

{exp:channel:entries limit="1" channel="testimonials" orderby="random" dynamic="no"}
    {exp:stash:set name='random_testimonial'}
        <div>
            {!-- testimonial content --}
        </div>
    {/exp:stash:set}
{/exp:channel:entries}
And here’s our new loop (again, remember dynamic=no! Also remember to use status='not closed' anytime you are pulling entries from multiple statuses at once.)
The append_list tag works a little differently from the tags we’ve seen so far; we actually set “sub-tags” up inside of it to hold our individual pieces. Because of that, we don’t usually want to set up the markup inside of the append_list; we’ll set it up later in our main loop.
{exp:channel:entries channel="people" orderby="title" sort="asc" dynamic="no"}
    {exp:stash:append_list name='people_list' context='{status}'}
        {stash:this_urltitle}{url_title}{/stash:this_urltitle}
           {stash:this_name}{person_firstname} {person_lastname}{/stash:this_name}
           {stash:this_bio}{person_bio}{/stash:this_bio}
           {stash:this_email}{person_email}{/stash:this_email}
    {/exp:stash:append_list}
{/exp:channel:entries}
The most important bit here is the context='{status}' parameter. What this does is splits up the items; the Featured items go into a list that’s named people_list but has context Featured, whereas the Open items go into a list that’s also named people_list but has context Open!
Now we’ll get the lists from inside our main loop, like so:
{exp:channel:entries limit="1" channel="structure_pages"}

    {exp:stash:set name='title'}{title}{/exp:stash:set}

    {exp:stash:set name='maincontent'}
        <div id="content" class="col685 gutter">
            <div class="pageContent">
                {!-- actual page content --}
            </div>
            <div id="listingContent" class="col685 peopleBlock">
                <ul id="featuredPeople">
                    {exp:stash:get_list name="people_list" context='Featured'}
                        <li>
                            <h3>{this_title}</h3>
                            <h4>{this_name}</h4>
                            <p>{this_bio}</p>
                        </li>
                    {/exp:stash:get_list}
                </ul>
                <ul id="normalPeople">
                    {exp:stash:get_list name="people_list" context='Open'}
                        <li>
                            <h3>{this_title}</h3>
                            <h4>{this_name}</h4>
                        </li>
                    {/exp:stash:get_list}
                </ul>
            </div>
        </div>
        <div id="sidebar" class="col265">
            {exp:stash:get name='random_testimonial'}
        </div>
    {/exp:stash:set}

{/exp:channel:entries}
Note that the Featured list and the Open list end up inside separate <ul> tags, and the Featured people show a bio while the unfeatured people do not!
Assigning Partials to Entries
You can use any of the usual methods to assign your partials to your entries. If you’re using a template_group/template structure, it should happen automatically; otherwise, you can use Structure’s Layouts dropdown, or assign individual partials per channel in Admin -> Channels -> Preferences.
It is important to remember that you should never assign a wrapper template to an entry. (That’s one reason why I always create them as hidden templates, myself.) The only templates that should ever be assigned to an entry are partials!
Things to Watch Out For
Parse Order
The most important thing to watch out for is, as always, parse order. Beware of it!
One thing I’ve seen a few newbies to Stash do is something like the following, which absolutely fails to work:
{exp:channel:entries limit="1"}
    {exp:stash:set name="mycontent"}
        {title}
        {body}
    {/exp:stash:set}
{/exp:channel:entries}

{exp:stash:get name="mycontent"}
The reason that this fails to work is that the exp:stash:get tag is parsed before the channel:entries loop, so at the time mycontent is “gotten” by Stash it has nothing in it yet!
That’s the most common case I’ve seen of the general rule violation, which is: You can’t get a value before the EE template parser has set that value! I’ve tried to point out, in the above walkthrough, all the places where we’re counting on parse order to make our jobs easier (or even possible), but the topic of parse order has a lot of nuances.
Accordingly, if you don’t feel like you’re an expert on (or at least well-acquainted with) the workings of the EE template parser, you need to fix that. The way I recommend doing so is by reading Lodewijk Schutte’s marvelous writing on the subject:
- Slideshow presentation from EECI 2011
- Parse Order: a PDF reference guide (This link is actually to an HTML-ified version of the PDF using Google Docs Viewer)
- Snippets and Preload Replace Variables, a guide to using snippets and preload:replace that also goes into some detail about parse order
Lists and Counting
In at least some versions of Stash, the {count}, {absolute_count}, and {absolute_results} variables do not work when using exp:stash:get_list inside of a native EE tag (like channel:entries or channel:category_archive). This is a conflict between the innards of Stash and EE’s native processing of these variables. I believe this has been fixed in the latest beta version; however, the current stable release as of this writing (2.0.7) contains the bug, so be aware of it.
You may never need this functionality—in two whole sites, so far we’ve only needed it once. The easiest way around it, if you do need it in the 2.0.7 release, is to hack the Stash module code to add a prefix to Stash’s versions of the variables. Don’t worry, this is much less scary than it sounds!
First, find lines 1069-1078 of the file mod_stash.php. (Line numbers are all for the 2.0.7 release.) That block looks like this:
// add absolute count to the ordered/sorted items
$i=0;
foreach($list as $key => &$value)
{
    $i++;
    $value['absolute_count'] = $i;
}

// record the total number of list rows
$list_markers['absolute_results'] = count($list);
Make it look like this by inserting the lines indicated:
// add absolute count to the ordered/sorted items
$i=0;
foreach($list as $key => &$value)
{
    $i++;
    $value['absolute_count'] = $i;
    $value['stash_absolute_count'] = $i; // insert this line!
}

// record the total number of list rows
$list_markers['absolute_results'] = count($list);
$list_markers['stash_absolute_results'] = count($list); // insert this line!
(We haven’t removed the ordinarily-named variables, because Stash uses them elsewhere; we’ve just added versions named {stash_absolute_count} and {stash_absolute_results}.)
Then, find lines 1094-1097 of the same file, mod_stash.php, which look like this:
if (count($list) > 0)
{
    // replace into template
    $list_html = $this->EE->TMPL->parse_variables($this->EE->TMPL->tagdata, $list);
BEFORE the comment // replace into template, we’re going to add a new variable called {stash_count}, so you’ll be left with this:
if (count($list) > 0)
{
    // Insert these lines to add stash_count to the ordered/sorted/limited/offsetted items
    $i=0;
    foreach($list as $key => &$value)
    {
        $i++;
        $value['stash_count'] = $i;
    }
    // End inserted lines
    // replace into template
    $list_html = $this->EE->TMPL->parse_variables($this->EE->TMPL->tagdata, $list);
That’s it! That’s all you have to do to fix the bug if you need to. Now if you need to use one of the variables inside a Stash list, just use the version with stash_ prefixed.
Final Notes
On Stash
We have barely scratched the surface, in this walkthrough, of what is possible with Stash. It is an immensely capable module; it has functionality for caching tags on a user or whole-site level (potentially increasing performance a great deal on tag-heavy pages), as well as doing some awesomely complicated things with regular expressions when setting or retrieving variables. It can also subvert the parse order of EE by parsing other tags inside Stash tags, and by pre-parsing variables inside other tags.
The upcoming version of Stash (in beta as of this writing) also has an “improved embed” capability which I know almost nothing about, but which will presumably enhance what can be done with templates even more!
On Synergy with Other Add-Ons
Mark Croxton, author of Stash, also maintains the marvelous If:Else and Switchee, both of which handle conditional logic in a way that is superior to EE’s native parsing of conditionals. Both are great tools for expanding your repertoire of template techniques and for handling those occasions when you need conditional logic in your templates. You should find that this happens significantly less often when using the template partials pattern, but it will happen at least occasionally.
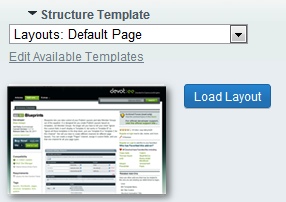
I use BoldMinded’s Blueprints in conjunction with Structure to assign partials to entries and also to create publish layouts for individual partials. One advantage of using Blueprints over Structure’s native template assignment dropdown–even if you don’t want to make dedicated publish layouts–is that you can choose to only allow templates from certain template groups, making it trivial to ensure that only partials get assigned to entries. Another very useful feature of Blueprints is that it allows you to create thumbnails for each template; this is a great visual cue for clients, and cuts down on the “which template do I assign?” conundrum immensely.
On Architecture
One thing some folks are talking about is implementing a Model-View-ViewModel (MVVM) architecture for templates in EE. In MVVM, you avoid having any markup in your ViewModel template, abstracting it all out into separate Views. Your wrapper, in this case, becomes a sort of “Super View”, which assembles your ViewModel with the other sub-Views needed to render all the markup. It’s a really interesting pattern, and I definitely feel like I’m still learning about it!
The approach I’ve described in this tutorial is definitely not as DRY as MVVM, but I believe it represents a good mix of maintainability and separation of concerns. Additionally, I think it’s easy for folks of all levels of EE experience to grasp once they dig into it, and that’s really important to me as someone who works with folks at all kinds of different EE skill levels. However, I do think going full-on MVVM has got some huge advantages (as well as some potential disadvantages)—I do plan to write a tutorial about it in the future.
Acknowledgements & Resources
This article would not have been possible without John D. Wells’ original article, which got me started really thinking about approaches to templates and EE architecture again after years of habit. It would also, of course, not have been possible without the excellent Stash addon by Mark Croxton.
In addition, several people kicked me in the ass either directly or indirectly to actually get this written instead of just talking about getting it written; the most influential were Brian Litzinger, Nate Doyle, and Steven Hambleton. Thanks, gentlemen. I’d also like to thank Chris Pickett for helping me work out some of the advanced bits of this tutorial, and also for being an excellent Rubber Duck.
I have a bunch of links related to template partials, both things I used as research for this article and also more tangentially-related resources. The list also contains some more general information related to EE and template parsing (especially parse order). I maintain said list as a (slightly haphazardly) curated bundle at Bit.ly—I do add new resources as I come across them, so remember to bookmark it!
Posted on Jun 06, 2012
 Post to Twitter