Reusable Form Templates with ProForm
by Isaac Raway
Editor Note: In this how-to article, ProForm developer Isaac Raway shows how to create reusable form templates with his ProForm module.
One of the features of ProForm is the ability to create a single template capable of rendering any form that is designed in the module. Creating a reusable form template is simple and it can provide the same consistent UI to all of your forms, reducing the amount of work it takes to create a new form.
Goals
The basic goals for this setup is to be as flexible as possible. To this end, the essential design for this system is intended to allow multiple ways of using the same base template:
- As a full form URL - this allows us to simply link to forms that have been created in ProForm, without having to hook up anything else
- As an embedded template - allows placing the form inside of another custom template that might also do other things
Setup
We will have a single template group to contain all the templates for our forms system:
forms
Within this template group, we will have these templates:
forms/index- allows loading forms directly from a URL.forms/_layout- contains the actual form tag and custom logic.
Follow the next sections in order to create the group and its templates now.
Template Manager
The Template Manager is where you can create and edit templates in EE:
- Log into your control panel
- Click Design > Templates > Template Manager
Create The Template Group
Once inside the Template Manager, do these steps to create the template groups:
- On the left side of the Template Manager, click New Group.
- Enter “forms” as the Template Group Name, leave the other settings blank.
- Click Submit.
Create _Layout Template
The index template is automatically created for us.
Next, create the _layout template:
- Click Design > Templates > Template Manager.
- On the left side of the Template Manager, click on the forms Template Group.
- On the right side of the Template Manager, click New Template to create a template within this group.
- Enter
_layoutas the Template Group Name, leave the other settings blank. - Click Submit.
Forms Index Template
Copy & paste the following code into the forms/index template.
{embed='forms/_layout' form_name='{segment_2}'}
You can use the same embed tag in other templates in order to inject the template layout into other areas of the site.
Forms Layout Template
The _layout template actually calls our form tag, using the form_name provided either from the index template or wherever else we might use the embed template.
This template is based on the one that’s automatically rendered by the exp:proform:simple tag, which you may want to use instead. However, by using the full form tag in our embed template, we can easily make changes to how each field type is rendered.
Copy & paste the following code into the forms/_layout template:
{exp:proform:head} {!-- Include the default ProForm styling. --}
{exp:proform:form form_class="proform {embed:form_name}_proform"
   form_name="{embed:form_name}" variable_prefix="pf_"}

   {if pf_no_results}
       Invalid form name specified!
   {/if}

   {if pf_complete}
       Thank you for your submission!
   {if:else}

   {pf_hidden_fields}
       <input type="hidden" name="{pf_field_name}" value="{pf_field_value}" />
   {/pf_hidden_fields}

   <input type="hidden" name="_pf_current_step" value="{pf_current_step}" />
   <input type="hidden" name="_pf_goto_step" value="" />

   {if pf_multistep}
       <ul class="pf_steps">
           {pf_steps}
               <li><a href="#{pf_step_no}" class="pf_step {pf_step_active}">{pf_step}</a></li>
           {/pf_steps}
       </ul>
   {/if}

   <div class="pf_wrap">

       {pf_fieldrows}
       <ul class="pf_row">
           {pf_fields}
               {if pf_field_type != "invisible"}
                   <li id="{pf_field_html_id}" class="pf_column {pf_field_html_class}">
                   {if pf_field_html_block}
                       {pf_field_html_block}
                   {if:elseif pf_field_heading}
                       <h3>{pf_field_heading}</h3>
                   {if:else}
                       {if pf_field_type != "checkbox"}
                           <label for="{pf_field_name}">{pf_field_label} {if pf_field_is_required}<span class="required">*</span>{/if}</label>
                           <div class="pf_field {if pf_vertical}pf_vertical{/if}">
                       {/if}
                       {if pf_field_type == "string"}
                           {if pf_field_validation:valid_email}
                               <input type="text" name="{pf_field_name}" id="{pf_field_name}" class="validate-email {pf_field_is_required}" value="{pf_field_value}" placeholder="{pf_field_placeholder}" />
                           {if:else}
                               {if pf_field_length <= 255}
                                   <input type="text" name="{pf_field_name}" id="{pf_field_name}" class="{pf_field_is_required}" value="{pf_field_value}" placeholder="{pf_field_placeholder}" />
                               {if:else}
                                   {if pf_wysiwyg}
                                       <textarea name="{pf_field_name}" id="{pf_field_name}" class="{pf_field_is_required}">{pf_field_value}</textarea>
                                       <script type="text/javascript">bkLib.onDomLoaded(function() { new nicEditor(pf_nic_config).panelInstance('{pf_field_name}'); });</script>
                                   {if:else}
                                       <textarea name="{pf_field_name}" id="{pf_field_name}" class="{pf_field_is_required}">{pf_field_value}</textarea>
                                   {/if}
                               {/if}
                           {/if}
                       {if:elseif pf_field_type == "text"}
                           {if pf_wysiwyg}
                               <textarea name="{pf_field_name}" id="{pf_field_name}" class="{pf_field_is_required}">{pf_field_value}</textarea>
                               <script type="text/javascript">bkLib.onDomLoaded(function() { new nicEditor(pf_nic_config).panelInstance('{pf_field_name}'); });</script>
                           {if:else}
                               <textarea name="{pf_field_name}" id="{pf_field_name}" class="custom_class_here {pf_field_is_required}">{pf_field_value}</textarea>
                           {/if}
                       {if:elseif pf_field_type == "date"}
                           <input type="text" name="{pf_field_name}" id="{pf_field_name}" class="date {pf_field_is_required}" value="{pf_field_value}" placeholder="{pf_field_placeholder}" />
                       {if:elseif pf_field_type == "datetime"}
                           <input type="text" name="{pf_field_name}" id="{pf_field_name}" class="datetime {pf_field_is_required}" value="{pf_field_value}" placeholder="{pf_field_placeholder}" />
                       {if:elseif pf_field_type == "time"}
                           <input type="text" name="{pf_field_name}" id="{pf_field_name}" class="time {pf_field_is_required}" value="{pf_field_value}" placeholder="{pf_field_placeholder}" />
                       {if:elseif pf_field_type == "integer"}
                           <input type="text" name="{pf_field_name}" id="{pf_field_name}" class="validate-integer {pf_field_is_required}" value="{pf_field_value}" placeholder="{pf_field_placeholder}" />
                       {if:elseif pf_field_type == "float"}
                           <input type="text" name="{pf_field_name}" id="{pf_field_name}" class="validate-float {pf_field_is_required}" value="{pf_field_value}" placeholder="{pf_field_placeholder}" />
                       {if:elseif pf_field_type == "file"}
                           <div class="pf_files">
                               <input name="{pf_field_name}" id="{pf_field_name}" type="file" class="{pf_field_is_required}" />
                           </div>
                       {if:elseif pf_field_type == "checkbox"}
                           <div class="pf_field">
                               <div class="pf_option">
                                   <input type="checkbox" name="{pf_field_name}" id="{pf_field_name}" value="y" {if pf_field_checked}checked="checked"{/if} class="{pf_field_is_required}" /><label for="{pf_field_name}">{pf_field_label}</label>
                               </div>
                           </div>
                       {if:elseif pf_field_type == "list"}
                           <select name="{pf_field_name}" id="{pf_field_name}" {if pf_multiple}multiple="multiple"{/if} class="{pf_field_is_required}">
                           {pf_field_setting_list}
                               <option value="{pf_key}" {pf_selected}>{pf_row}</option>
                           {/pf_field_setting_list}
                           </select>
                           {if pf_field_style == "checkboxes"}
                               {pf_field_setting_list}
                               <div class="pf_option {if pf_vertical}pf_vertical{/if}">
                                   <input type="checkbox" name="{pf_field_name}" id="{pf_field_name}_{pf_key}" value="{pf_key}" {if pf_selected}checked="checked"{/if} class="{pf_field_is_required}" /><label for="{pf_field_name}_{pf_key}">{pf_label}</label>
                               </div>
                               {/pf_field_setting_list}
                           {if:elseif pf_field_style == "radios"}
                               {pf_field_setting_list}
                               <div class="pf_option">
                                   <input type="radio" name="{pf_field_name}" id="{pf_field_name}_{pf_key}" value="{pf_key}" {if pf_selected}checked="checked"{/if} class="{pf_field_is_required}" /><label for="{pf_field_name}_{pf_key}">{pf_label}</label>
                               </div>
                               {/pf_field_setting_list}
                           {/if}
                       {if:else}
                           {if pf_field_driver}
                               {pf_field_driver}
                           {if:else}
                               <input type="{pf_field_control}" id="{pf_field_name}" name="{pf_field_name}" value="{pf_field_value}" class="{pf_field_is_required}" />
                           {/if}
                       {/if}

                       {if pf_field_error}<div id="text-E" class="errMsg"><span>{pf_field_error}</span></div>{/if}

                       {if pf_field_type != "checkbox"}
                           </div>
                       {/if}
                   </li>
                   {/if}
               {/if}
           {/pf_fields}
           </ul>
           <div class="pf_clear"></div>
       {/pf_fieldrows}

       <div class="pf_buttons">
           {if pf_use_captcha}
               <div class="pf_captcha">
                   Enter this word: {pf_captcha}<br/>
                   <input type="text" name="captcha" />{if pf_error:captcha}<span class="error">{pf_error:captcha}</span>{/if}
               </div>
           {/if}
           {if pf_multistep}
               <input type="submit" name="_pf_goto_previous" value="< Previous" {if pf_on_first_step}disabled="disabled"{/if} />
               <input type="submit" name="_pf_goto_next" value="Next >" {if pf_on_last_step}disabled="disabled"{/if} />
           {/if}
           {if pf_on_last_step}
               <input type="submit" name="_pf_finish" value="Submit" />
           {if:else}
               <input type="submit" value="Submit" disabled="disabled" />
           {/if}
       </div>
       {/if}
   </div>
{/exp:proform:form}
Creating A Contact Form
Now that we have a flexible structure setup for handling requests for forms, we just need to create a form to display inside of this structure.
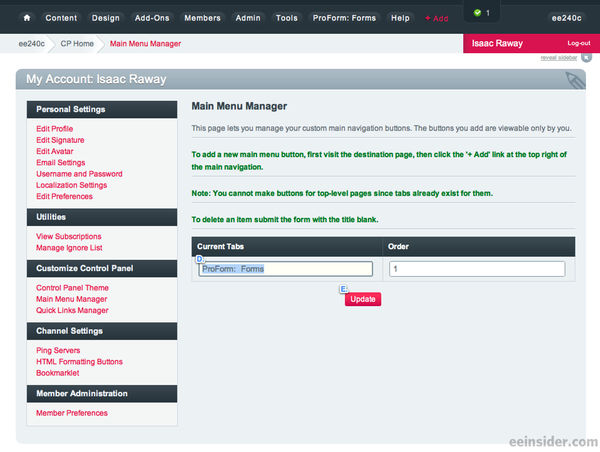
Creating a ProForm Menu Item
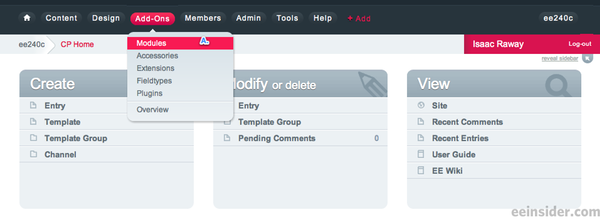
First we want to create a menu item to ProForm so it will be easier to get to.
- Click Add-ons > Modules. (A.)
- Click ProForm in the list. (B.)
- Click the + Add link in the menu bar. (C.)
- Edit the menu if you wish (I recommend either just “Forms” or “ProForm”). (D.)
- Click Update. (E.)

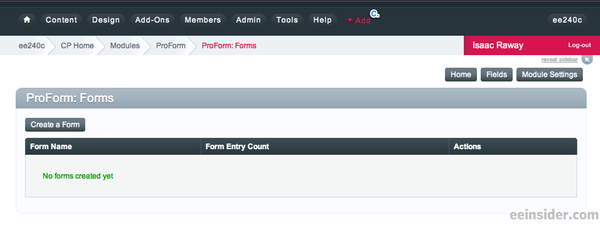
Creating a Contact Form
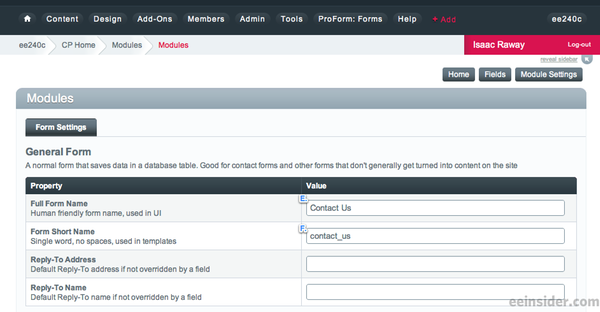
Creating a form is very simple - you only need to specify ONE value, a name for the form.
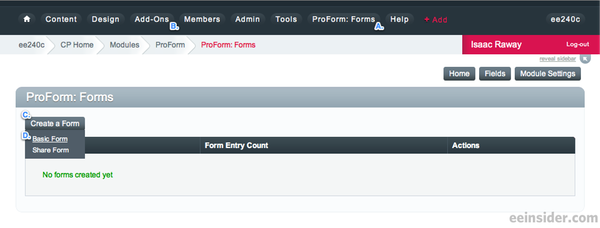
- Go to ProForm using the custom menu item (A.) created above, or by clicking Add-ons > Modules (B.) then selecting ProForm from the list.
- Mouse over the Create a Form menu. (C.)
- Click Basic Form. (D.)
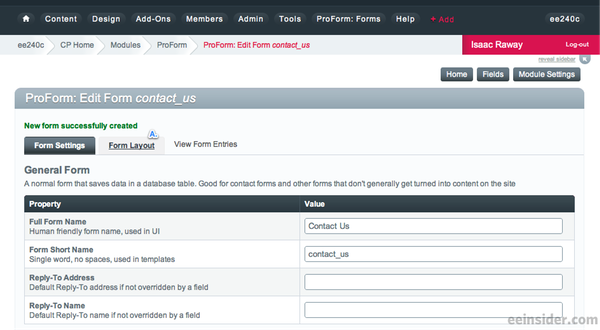
- Give the form the Full Name “Contact Us”. (E.)
- Scroll down to the bottom of the page and click Save Form. (F.)
Notice that the form’s Short Name is automatically created based on the full form name. This is the name we will use to refer to the form. Leave the default name created from the full form name, “contact_us”.
Ignore the rest of the settings, none of them are required. In a later tutorial I’ll cover how to setup a simple email notifications, but for now we will need to check in on the entries for this form to see new submissions.

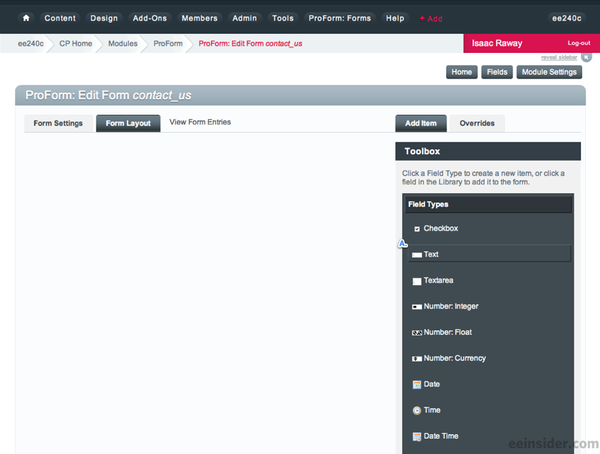
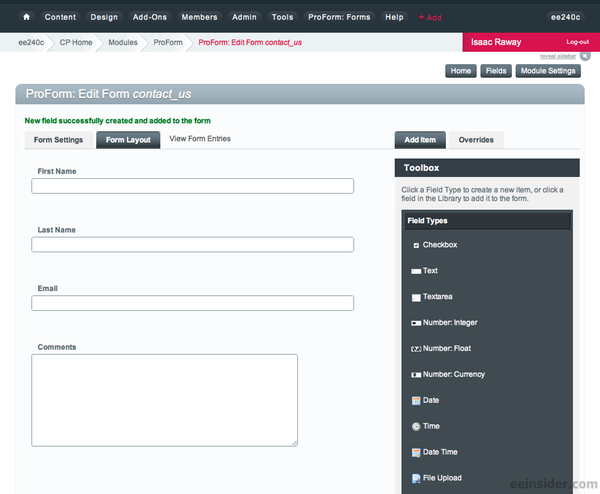
Opening the Form Layout
After creating the form, we just need to add a few fields in order to specify what information we want to collect. Adding fields to a form is done from it’s Form Layout tab. There are two ways to get to this tab:
If you’ve just created the form above, you just need to click it’s Form Layout tab (A.) to edit the fields assigned to the form.
If you’ve navigated away from the form already, you can get to it’s layout just as easily:
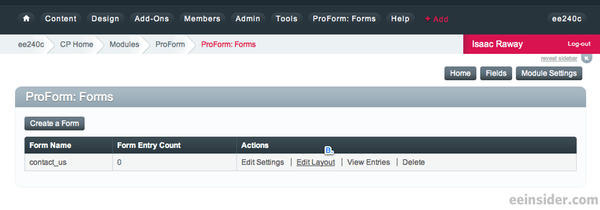
- Go to ProForm using the custom menu item created above, or by clicking Add-ons > Modules then selecting ProForm from the list.
- Click Form Layout next to the contact_us form. (B.)
Adding a Field
We will perform these steps for the 4 fields that comprise the Contact Us form.
To add fields to a form:
- Click on the type of field you wish to add to the form in the Toolbox. (A.)
- Specify a Label for the field. (B.)
- Modify the Name of the field if you wish. (C.)
- Select validation options by picking an option from the dropdown (D.), then clicking the + button (E.)
- Click Submit. (F.)
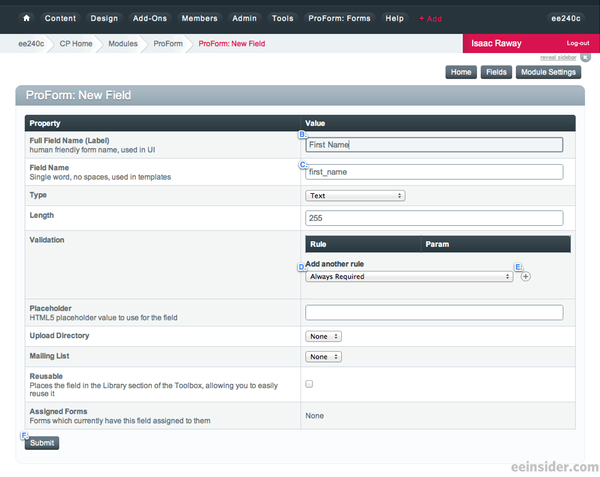
Adding Contact Us Fields
Perform the above steps in the Adding a Field section for each of the following fields, using the values as shown:
| Field Type | Field Label | Field Name | Validation Rules To Add |
|---|---|---|---|
| Text | First Name | first_name | None |
| Text | Last Name | last_name | None |
| Text | Valid E-mail Address | ||
| Textarea | Comments | comments | None |
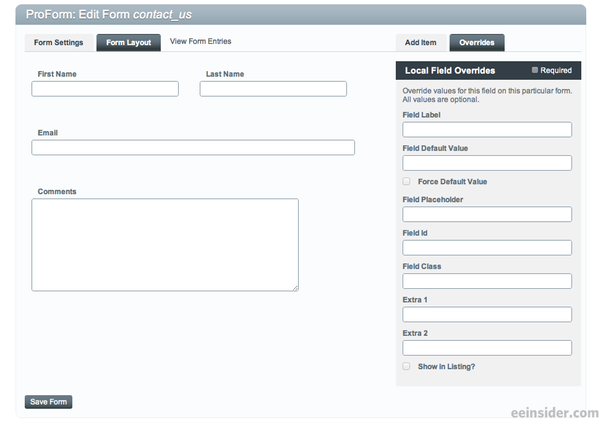
After adding these fields you should see the following in the layout:
Moving Fields
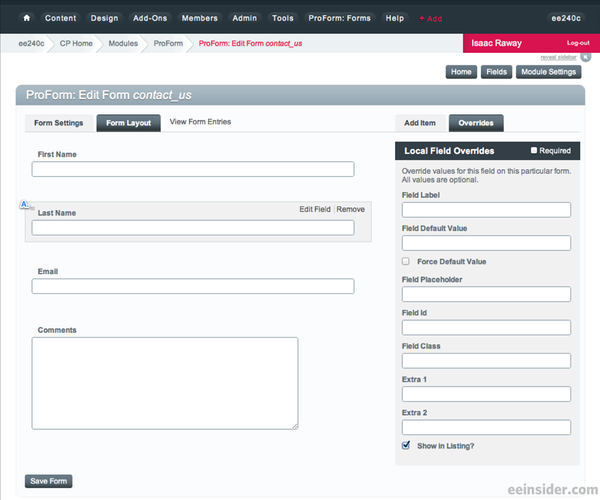
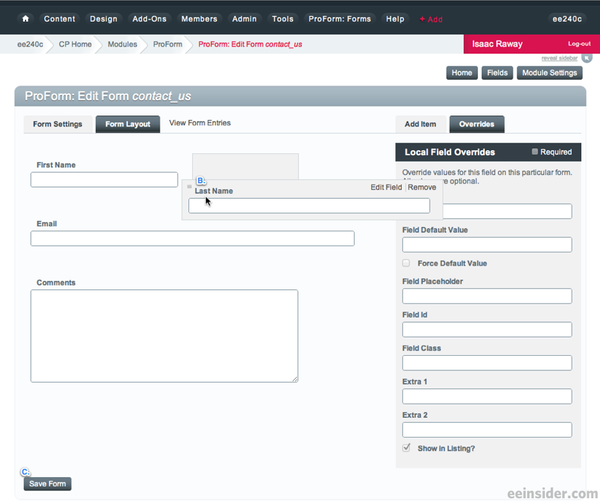
To move a field:
- Click on the area around it to select the field. (A.)
- Drag the field from it’s drag handle or area surrounding the example field to move it to a new row. (B.)
- Scroll to the bottom of the screen and click Save Form. (C.)
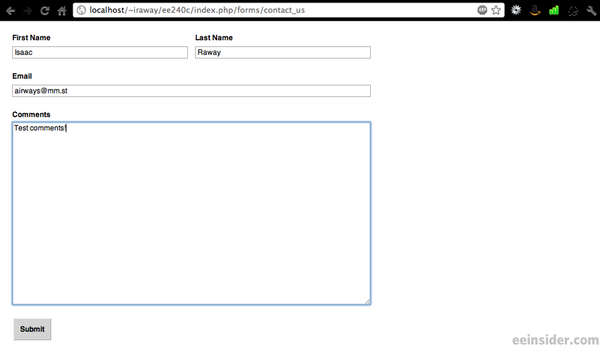
Linking to The Form
To link to the form, simply create a link in your content or menu system to link to the following URL:
http://example.com/forms/contact_us
Due to the way that we setup the index template for the forms group, the Contact Us form should be displayed without any further configuration:
Viewing Form Entries
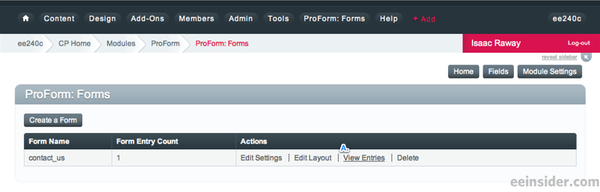
To view entries for a form:
- Go to ProForm using the custom menu item created above, or by clicking Add-ons > Modules then selecting ProForm from the list.
- Click the View Entries link next to the contact_us form. (A.)

Posted on Jun 05, 2012
 Post to Twitter