Installing ExpressionEngine
by Ryan Irelan
For the latest tutorial on installing ExpressionEngine 2, please see Mijingo’s Installing ExpressionEngine video. It walks you through the process step-by-step!
So, you’re ready to jump into the world of ExpressionEngine? You’ve got your tutorials in front you and are ready to start building your first EE-powered website. All you need to do is install ExpressionEngine on your local computer of web server and then it’s off to the races! This guide to installing EE will help you kick start the EE learning process.
System Requirements
Before beginning you must first ensure that your web host meets the minimum requirements to properly run ExpressionEngine. These are all listed out in the EE Documentation, but here’s a list for you:
- PHP 4.1 or newer
- MySQL 3.23.32 or newer
- FTP or SFTP access to upload the files
These aren’t crazy requirements and almost every reliable host out there should support them. If your server supports the short list above, then you’ve passed the first test. There are, however, a few more things we need to check before moving forward with the install.
The fine people that make ExpressionEngine have made this easy for us by creating a Server Wizard, which you upload to your server and run. It checks for more detailed server support (including your PHP and MySQL versions, but also for some suggested PHP libraries). Download the wizard.php file and the upload it to the root of your website on your web server. Load the page in your browser (e.g. http://foo.com/wizard.php).
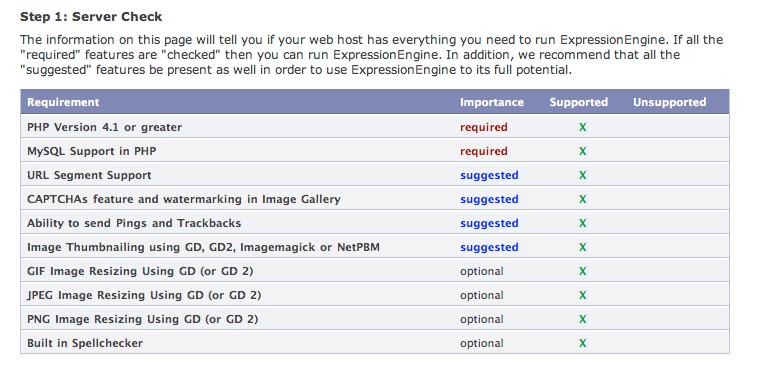
The first page of the wizard presents a table of requirements and your server’s support. If you have green X’s all the way down then you’re in good shape. If, for some reason, one or more of the required items are marked “Unsupported” you shouldn’t move forward with installing ExpressionEngine. In addition to the items marked as required in the Server Wizard, I also recommend “URL Segment Support” be treated as required, since it’s very useful library to have at your disposal when building more complex ExpressionEngine websites.
Below this table you will see Step 2. It’s not required you do this, but it might be a good idea to test that you can connect to your database before moving forward with the installation. It’s as easy as inputting your MySQL server address, username, password and database name (if you haven’t yet created the database for EE, you’ll need to do that first).
If everything checks out, you’re ready to install ExpressionEngine. Onward!
Installation
I’m going to assume you already downloaded EE Core or paid for a license and downloaded either EE Personal or EE Professional. Regardless, in order to proceed you need to have downloaded the EE software from the ExpressionEngine website.
First, unzip the .zip file you downloaded and then upload those files to your web host via FTP or SFTP. Be sure to upload all text files in ASCII mode and all images in binary mode. Some FTP software have an “auto” mode. That should work nicely.
The next step is to make sure we have the file permissions properly set. You must set the following files to 666 on UNIX servers or “Writeable” on the Windows operating system.
path.phpsystem/config.phpsystem/config_bak.php
The following files and directories must be set to the permissions 777 on UNIX or “Writeable” on Windows:
system/cacheimages/avatars/uploadsimages/captchasimages/member_photosimages/pm_attachmentsimages/signature_attachmentsimages/uploads
With that all set, you are now ready to run the Installation Wizard. This is part of the EE software you just uploaded to your web server. Navigate to your domain and then append install.php to the end of the URL, like this: http://foo.com/install.php This should bring you to the ExpressionEngine Installation Wizard.
Follow the steps of the wizard, inputting all of the required information and then click the “Click Here to Install EE” button. After just a few seconds, you should see a “ExpressionEngine was Successfully Installed” message. If you see an error message, please re-check the information you entered and try again.
Before you jump for joy, please delete the install.php file from your server. This is a security measure to prevent someone from coming behind you and overwriting your website.
If you’re a more visual person, I recommend my short Installing ExpressionEngine screencast. It’s a free episode of a larger series of screencasts on building websites with ExpressionEngine.
Posted on Nov 29, 2008
 Post to Twitter